This is a scenario for MK Rebellion that you can play all by yourself. You compete against an opponent for whom you make the moves according to precise heuristics.
OBJECT
You control a 100-point team of warriors from the Black Powder Rebels faction on assignment
to infiltrate an enemy base and make an assassination. Your team is comprised of small men that have
been specially trained for this kind of job. The opponent (hereafter referred to as "the Enemy") is a 200-point army of
warriors from any faction that are dispersed throughout the base, patrolling its corridors. The Enemy's army includes a "Boss", the
mightiest among them. When the Boss is attacked he calls all of his minions to his aid. You win if you eliminate the Boss.
ARMIES
Your army must consist of warriors from the Black Powder Rebels faction, with the added restriction that you may have no warrior in your army with
a point value of more than 30 points. Keep in mind that you will have only one action each turn.
After you have formed your army, you must form the Enemy's army. When picking warriors for the Enemy's army, avoid figures that are less useful by themselves because they have abilities such as Defend, Magic Enhancement, etc, and figures that have abilites that are not used in this scenario (see the section HOW THE ENEMY USES SPECIAL ABILITIES). Also avoid mounted figures. Really, you can pick whatever 200 points worth of figures you would like to go up against. For a good challenge, pick figures that you consider to be effective.
The warrior in the Enemy's army that has the highest point value will be the Boss. The Boss should have a point
value in the vicinity of 30-50 points. For instance, a Werebear would make a good Boss. (If this is still too
easy for you, up the point value of the Boss!)
SETUP
The battlefield must be a square area of 2.5' x 2.5'. The only terrain that is allowed
is blocking terrain. The more blocking terrain you place, the more it will be to your advantage, even
though you are Black Powder Rebels. The Enemy's warriors do not know of your presence
initially and cannot 'see' you past the blocking terrain.
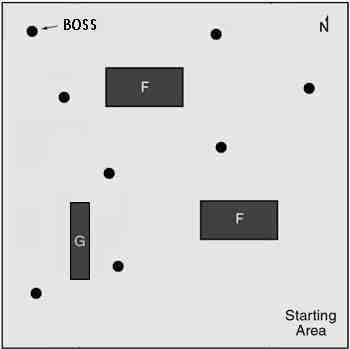
Place your army in one of the four corners of the battlefield. Place the Boss in the opposite corner. Place the remainder of the Enemy's army scattered throughout the battlefield, but atleast 10" away from any of your warriors. It does not matter which direction each warrior of the Enemy's army is facing. The diagram to the right is an example of a battlefield ready to go
PLAYING THE GAME
You have one action each turn. The Enemy has two actions each turn. Play according to the standard
rules of Mage Knight Rebellion. There is no time limit. Since there is no scoring for points, it will do you
little good to capture. The game ends when the Boss has been eliminated, when your entire army
has been eliminated, or when you give up. The remainder of this document explains how the Enemy uses its actions each turn.
"RANDOMLY DETERMINE"
You will often be required to "randomly determine" which warrior the Enemy will give an action to when there
are several candidates. To do this, mentally assign numbers to
all legal candidates, and then roll dice to select one of them in such a fashion that there is an equal probability that any of the candidates
will be selected. For instance, if there are four warriors that the Enemy might move, you could mentally assign the numbers 1-4 to them, and
then keep rolling one six-sided die until a number from 1-4 comes up. You will become quite adept at this once you get the hang of it.
Also, it helps greatly if you own multi-sided dice, like four-sided, eight-sided, ten-sided, etc. You can cut down on the amount of rolling
you must do if you use these.
ENEMY WARRIOR STATES
Each warrior that the Enemy controls will always be in one of three states, "Patrolling", "Alerted", or
"Retreating". You must remember which state each warrior is in. All Enemy warriors begin the game in the
Patrolling state. These warriors are not yet aware of your presence. They are just meandering around the battlefield randomly.
Alerted warriors are aware of your presence and are on the offensive. They may be currently engaged in combat
with your warriors, or moving in the general direction of the action. Retreating warriors are Demoralized warriors
that are moving away from the action.
The life of an Enemy warrior can be described thus: Patrolling -> Alerted -> Retreating. Enemy warriors change states according to the following criteria.
A Patrolling warrior becomes an Alerted warrior if...
HOW THE ENEMY SELECTS WHICH WARRIORS TO GIVE ACTIONS TO
The Enemy will always adhere to the following order of priority in selecting which warriors
to give actions to on any particular turn.
Warriors that still have action tokens are never considered as candidates to give actions to. There is one exception--If an Enemy warrior has a damage value of 3 or greater, and could make a legal attack this turn against a warrior of yours that has a damage value of 3 or greater, consider it as a candidate for giving an action to. This is the only circumstance under which the Enemy will "push" a warrior.
The Enemy never passes if it has any actions available.
HOW SELECTED WARRIORS MOVE
An Alerted warrior that has been selected for action this turn will make a range or close combat attack
if possible. If there are more than one of your warriors that it could attack iin one turn,
randomly determine which one of your warriors it attacks.
An Alerted warrior that cannot attack
this turn, but could attack after moving once, will move to the minimum distance necessary to attack.
(Such a warrior may need to break away in order to get into a position in which it could attack)
If there are more than one of your warriors that it could move into position to attack the next turn, randomly
determine which of your warriors it is gunning for.
For instance, an Enemy warrior with no range will move base to base with one of your warriors. An Enemy warrior with range will move just close
enough so that it could take a legal shot at one of your warriors the following turn (not that it will necessarily do so). Or, if none of your nearby warriors
are legal targets because they are base to base with other Enemy warriors, it will also move in base to base.
Whenever an Enemy warrior moves base to base with one of your warriors, it will always do so in such a way
that it touches none of your other warriors, if possible. Secondly, if there are already any friendly warriors base to base with your warrior,
it will move so that it touches your warrior's back arc, if possible.
An Alerted warrior that cannot attack this turn nor the following turn will move its speed value in the general direction of your army. If your army is scattered, randomly determine which one of your warriors it moves towards. If friendly warriors or blocking terrain is in its way, it will take the shortest route around them to get to your warrior(s).
A Patrolling warrior will either spin in place, or move in the direction it is currently facing.
Roll one six-sided die to determine this:
On a roll of 1 it spins 90 degrees clockwise.
On a roll of 2 it spins 180 degrees.
On a roll of 3 it spins 270 degrees clockwise (90 degrees counter-clockwise).
On a roll of 4 it moves forward one half of its speed value, rounded up, or until its movement is blocked.
On a roll of 5 or 6 it moves forward its speed value, or until its movement is blocked.
(Many moves that Patrolling warriors make will be pointless moves, such as trying to move forward when there is blocking terrain in its way)
A Retreating warrior will move in the opposite direction of where your army is. If your army is scattered, it will move away from whichever of your warriors it is nearest to.
Enemy warriors that have legal targets to attack never attempt to break away.
Enemy warriors never make capture attempts.
Enemy warriors never attack or move in formations.
ENEMY FREE SPINS
Whenever an Enemy warriors has an opportunity to "free spin", whether because one of your warriors
moved in base to base, or because it failed a break-away attempt, it will spin to face your warrior.
If there are more than one of your warriors that it could face, randomly determine which of your warriors
it spins towards. It will attempt to include as many of your warriors in its front arc as possible. Secondly,
it will avoid exposing its back arc to the front arcs of the rest of your warriors, if possible.
HOW THE ENEMY USES SPECIAL ABILITES
The following list contains notes on how the special abilites of Enemy warriors are used. These
notes take precedence over the heuristics described up to this point.
For simplicity's sake, some abilites are never used at all, primarily abilities that require
some intelligence to use. Assume that the Enemy never turns off optional special abilites unless specified below.
(no notes are necessary for most of these)